
You have a battery-free NFC badge. This guide shows how to write a link to it and switch on the energy harvesting that lights the eyes, using the free NFC Tools app. It takes about two minutes.
This guide and the village record nothing. There is no database, no account and no upload. The only place anything is saved is the chip on your own badge.
About the badge
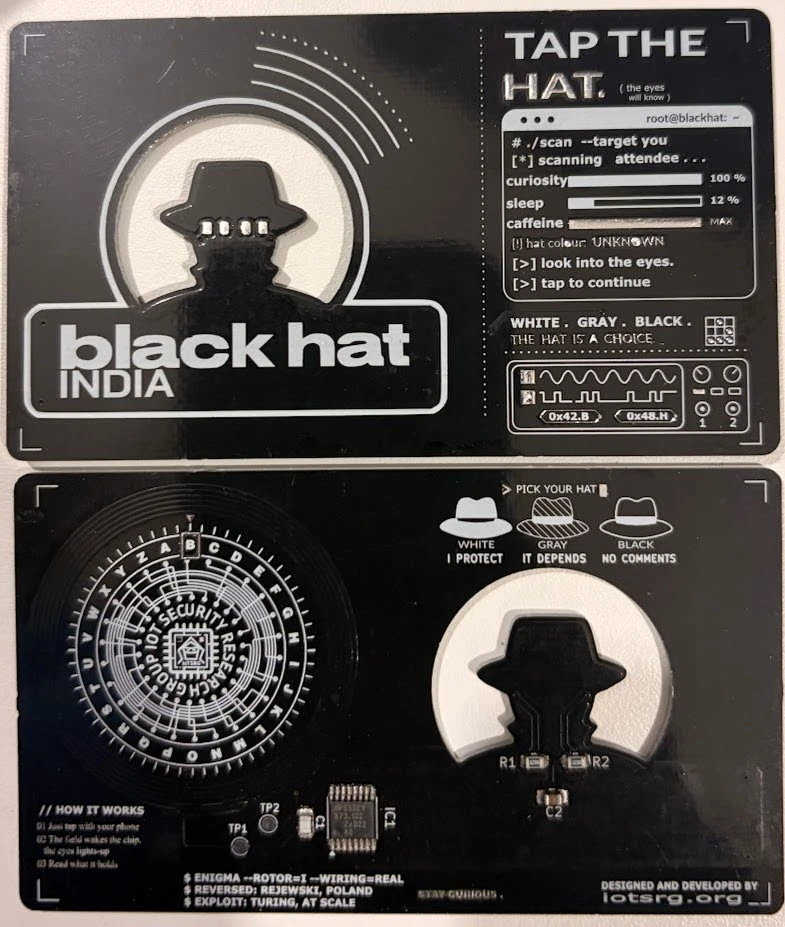
The badge is a credit-card-sized circuit board with no battery. The Black Hat India hat-man is on the front, and his eyes are two real LEDs. Hold a phone against the hat and the eyes light while the phone opens a link. Everything that makes this happen is drawn on the board.
Front. The hat-man, a contactless mark above the hat showing where to tap, and a terminal session logged in as root that scans you instead of the other way around. Its verdict, hat colour: UNKNOWN, is the badge's question: WHITE . GRAY . BLACK . THE HAT IS A CHOICE. A 3 x 3 grid of gold dots next to it is Conway's glider, the emblem of hacker culture, which also hides a number worth decoding. In the corner, an oscilloscope trace shows what a tap looks like on the wire, with the data bytes spelling BH.
Back. The copper rings are the NFC antenna. Around them is Enigma Rotor I with its real internal wiring: all 26 lines land where the real rotor's wires do. Three lines of terminal text cover who reversed the Enigma and who exploited it. Three answers to the front's question sit below: WHITE: I PROTECT, GRAY: IT DEPENDS, BLACK: NO COMMENTS. The hat-man appears again from behind, in copper, with the traces that power his eyes running up through him. Designed and developed by IoTSRG.
Where to tap. iPhone: touch the top edge of the phone to the hat. Android: turn NFC on and use the top or middle of the back of the phone.
A full design explainer, with the glider, the scope trace and the Enigma wiring decoded line by line, is published separately.
Why the badge has NFC
Tap the badge with a phone and two things happen at once: the eyes light up, and the phone opens blackhat-india.com. There is no battery on the board. Everything runs on energy that the phone's NFC field puts into the coil during the tap.
That is the point of the badge. It is a working demonstration of energy harvesting, the same technique behind battery-free sensors, smart labels and tags that run a microcontroller from a reader's field. You soldered the whole circuit yourself, and by the end of this guide you will have programmed the chip too.
Two steps, two parts of the chip
Programming the badge is two separate jobs, because the chip has two kinds of memory.
- The link goes into the NDEF area. This is the part every phone reads on a tap, and any NFC writer app can write it. You will use the normal Write screen in NFC Tools.
- Energy harvesting is a setting in the chip's configuration area. Phones never read it, normal NFC apps cannot reach it, and it only answers to the chip maker's own commands. That is why step 2 uses the Advanced NFC commands screen and a line of raw bytes. It is one command, and this guide explains every byte of it.
You need an Android phone with NFC and the free NFC Tools app by wakdev from the Play Store. iPhones cannot send the raw command, but they read the finished badge and light the eyes just as Android does.
What is and is not stored
- Your phone: NFC Tools shows the chip's replies in an on-screen log and that is all. Tap Clear or close the app and the log is gone.
- Network: nothing in these steps needs an account or an upload. Decline any permission request other than NFC.
- Identity: the link and the setting are the same on every badge. The chip's serial number, which the app shows when it finds the tag, is set at the factory and readable by any NFC reader. It is not tied to you.
- The village: badges are checked at the bench by tapping them. Nothing is logged and nothing goes into a database.
What you write goes into the chip on your badge and stays there. Any phone can read it afterwards without the app.
Step 1: write the link
This uses the normal Write feature, the same way you would write any NFC tag.
- Install NFC Tools from the Play Store and turn NFC on in your phone settings.
- Open the app and go to the Write tab.
- Tap Add a record, choose URL / URI, and enter:
https://www.blackhat-india.com/
- Tap Write, then hold the phone flat and still against the badge until the app says the write succeeded.
Tap the badge once with normal NFC to check: the phone should offer to open the link. The eyes will not light yet. That is step 2.
Step 2: switch on energy harvesting
This is the one place you need the Advanced screen, because the setting is in the chip's configuration area rather than its NDEF memory.
- In NFC Tools go to Other, then Advanced NFC commands, and accept the warning.
- Set I/O Class to NfcV (ISO 15693). This matters. The default, NfcA, is for a different chip family and fails with "Unable to get NfcA instance".
- Paste this into the Data field:
02:C1:04:3D:0B:00:00:00, 02:C0:04:3D:00
- Hold the phone flat and still against the badge and tap Send command.
What the log should show
| Log line | Expected reply | Meaning |
|---|---|---|
| Chip detected | 02:28:...:04:E0 | An NXP ISO 15693 chip was found |
02:C1:04:3D:0B:00:00:00 | 00 | The setting was accepted |
02:C0:04:3D:00 | 00:0B:00:00:00 | The chip read it back: harvesting is on |
Two replies, both starting with 00, and the badge is done. Lift the phone and go to Testing.
If you see Error: I/O failure, the phone lost contact with the chip mid-command. Lift it, put it back over the centre of the badge, and send again. If it fails three times in a row, ask a volunteer at the bench.
Why this command
The chip is an NXP NTAG 5 link. Its energy harvesting switch lives in configuration block 3D, which is only reachable with NXP's own Write Configuration command. The line you sent is that command, followed by a read of the same block so you can see it took.
02:C1:04:3D:0B:00:00:00
| Byte | Value | Meaning |
|---|---|---|
| 1 | 02 | ISO 15693 flags: high data rate, one tag |
| 2 | C1 | Write Configuration (NXP custom command) |
| 3 | 04 | NXP's manufacturer code, required for custom commands |
| 4 | 3D | Configuration block 3D, the energy harvesting settings |
| 5 | 0B | The setting itself, decoded below |
| 6 to 8 | 00 00 00 | The rest of the block: event-detection pin off, reserved bytes zero |
What 0B means (binary 0000 1011):
| Bits | Value | Meaning |
|---|---|---|
| 0 | 1 | Energy harvesting enabled |
| 2:1 | 01 | Output voltage 2.4 V, right for the red LEDs |
| 3 | 1 | Switch the output on immediately at power-up, without first checking the field strength |
| 6:4 | 000 | Minimum current threshold 0.4 mA (ignored when bit 3 is set) |
Bit 3 is why the eyes light on every tap rather than only on strong phones. With it clear, the chip would measure the field first and refuse to light on a weak one. It would also block the link from being read until the check passed.
02:C0:04:3D:00 is Read Configuration: the same block, zero extra blocks. The reply 00:0B:00:00:00 is a success flag followed by the four bytes you just wrote.
The setting is kept in EEPROM, so it survives without power and applies every time any phone powers the chip from now on. Everything here is in NXP's public NTP53x2 data sheet, sections 8.1.3.18 and 8.2.3.2.
Testing it
Lift the phone off the badge, then tap it again with normal NFC (no app open). Two things should happen within a second:
- The eyes light.
- The phone shows a prompt to open blackhat-india.com.
If both happen, your badge is done. Try it on a friend's phone too. Recent iPhones read it from the lock screen. Older models need an NFC reader app.
If it does not work
- Phone does not react at all: the phone's NFC antenna is not over the badge, or NFC is off. Check that NFC is on, then move the phone slowly across the badge until it responds.
- Link opens, eyes stay dark: step 2 did not complete, or an LED is the wrong way round. Repeat step 2 and check that the log shows
00:0B:00:00:00. If it does, show a volunteer. - Eyes flicker, link sometimes opens: weak coupling. Hold the phone flat and still, directly over the badge, for a full second.
- NFC Tools detects the chip but every command fails: a joint on the chip needs attention. Show a volunteer at the bench.
Check the chip's status. In Advanced NFC commands, send 02:C0:04:A0:00. The reply is 00: followed by a status byte. If that byte has bit 1 set (02, 03, 92, 93 and so on), the harvested power is reaching the chip and everything downstream works. If bit 1 is clear (01, 81, 91), the chip switched its output on but no power came back, which points at the board rather than the programming.
Take it further
The badge is yours to reprogram. Some things to try after the event.
Change the link. Any NFC writer app can overwrite the NDEF part with your own URL, contact card or text. Energy harvesting stays on, because it lives in the configuration area those apps never touch. The chip has 2048 bytes of user memory, so there is room for more than one record.
Read the chip's live status. Blocks A0 to AD are registers you can read at any time with 02:C0:04:A0:00 and so on. They show whether the field is present, whether harvested power is reaching the chip, and the state of the harvesting block. Reading never changes anything.
What is locked. Before you leave the bench, a volunteer locks the chip's configuration and sets its passwords. After that, nobody can change the harvesting setting, disable the badge or lock its memory read-only from a phone, including you. The link stays yours to rewrite with any NFC app, as often as you like. If a rewrite goes wrong, run step 1 again.
Use the badge as an NFC field detector. Once configured, the badge harvests energy from any 13.56 MHz RF field, so it also works as a simple passive field detector. Hold it near an active reader, such as a payment terminal, an access control pad or a phone's NFC coil. The LEDs light whenever a field is present, even without an NDEF session.
If you want to go deeper, the chip is an NXP NTAG 5 link and its full command set is in the public NTP53x2 data sheet. Experiment on your own badge, not someone else's.
About the village
The Soldering Badge Village at Black Hat India 2026 is run by IoTSRG, the IoT Security Research Group, in collaboration with Black Hat India. IoTSRG designed the badge for the event: the Black Hat India figure on the front, and the IoTSRG coil and credit on the back.
Everyone who sits down at the bench leaves with a working piece of hardware they built and programmed themselves, and a clearer picture of how battery-free NFC devices work. Every soldered badge is checked at the bench with the same NFC Tools command in this guide, so if yours worked at the village, it was programmed exactly this way.
More from IoTSRG at iotsrg.org. Event details at blackhat-india.com.